The mission
Living on the Northwest Coast of British Columbia is beautiful - but it has its drawbacks. I need a greenhouse just as much to divert the rain as I do for the season extension. My first season gardening here was a disaster. Between the slugs, deer, and neverending rain - I managed to eke out a wonderous supply of tea herbs – but not much else from the garden.
To solve several of these issues that led to such a disappointing production (besides still learning the land and its ways) I set out to build a greenhouse, and apply as many permaculture principles to the thing I could.
Requirements and constraints
- I already knew I would likely need to purchase poly for this, so it should cut out as many outside inputs as possible
- It should be built in such a way that I can recycle, reuse or salvage as many materials as possible
- The design can’t be too complex, because I’m just not that handy (yet)
- It should be relatively cheap
- It should survive the crazy winter winds (the islanders up there eat 100km/h gusts for breakfast)
- It should be large enough to grow a significant amount of food - on all axes
- The door and path should be wide enough to allow a wheelbarrow through
- It should fit somewhere out of the way while optimizing sun exposure
Designing
I’ve been a fan of Edible Acres’ YouTube channel for years now - and always enjoyed their experiments. One of these experiments is the cattle panel greenhouse. This design seemed to fit all the criteria I had for this project so naturally, I got to work.
For the most part, I knew my designs would largely have the be based on the material I could acquire for this project. I needed something to form the shape and hold the poly.
I set out clearing an area that was overgrown with salmonberry bushes, and staking out approximate sizes. There were very little earthworks required, besides clearing a few salmonberry rootballs and covering the area in a few wheel-barrow loads of sand in an attempt to improve drainage around the future greenhouse.
It was already early spring by this time, and I had started and acquired a ton of seedlings that were ready to grow.
Acquiring materials
One thing I always hated about the property was that the surrounding woods had been used as a dumping site in years past. However, as they say in permaculture: the problem becomes the solution. I scrounged around and took stock of everything I had at my disposal. In the end, this is what I used:
Found materials
- 1x rusty ~40’ roll of concrete remesh, embedded in a 10 year old red alder tree
- several different sized cedar beams, decaying, but with many years left on them
- fallen hemlock branches, driftwood
- leftover scrap dimensional (and some hand-milled chunks) lumber from various projects
- a neighbour with a portable mill (slab ends and off-cuts)
- the same neighbour with an excavator, working on earthworks (all the beautiful forest humus mixed with silt and clay I can carry)
- 1x set of old door hinges
- a forest and ocean beach worth of organic matter
Purchased materials
- 1x 60’ roll of 6mil poly, only using ~40’ (about $65 CAD)
- a fistful of deck screws (about $3 CAD)
- 32’ of dimensional lumber from the store (about $30 CAD total)
- UV-resistant poly-tape (about $6 CAD)
I realize that not everyone has such resources at their disposal, but through design, we can adapt to the environment, and create something that works for us.
Putting together the frame
First, I measured and re-staked the shape I wanted on the ground, based on the new materials I had found. Then, I dug posts in at all the corners, plus 1 in the middle on each side. The posts stuck out about 2’ from the ground.
Next, I attached 16’ 2x4s on each side to secure the posts, and hold the re-mesh in place.
I measured and cut the concrete re-mesh. This was extremely difficult to manage by myself, as it forms is quite springy. Get help! It took a while, but I managed to get each piece into place, against the supports on the posts. Once I had it positioned the way I wanted it, I drove the spiky ends of the re-mesh into the ground. Since I left the cuts open, they had about 5” in the ground. This, coupled with the pressure of the roll against the 2x4s (in the arch shape) was plenty strong to hold them in place. I strategically placed some screws along the 2x4s to hold the mesh in position. This part alone took me about 4 hours on my own!
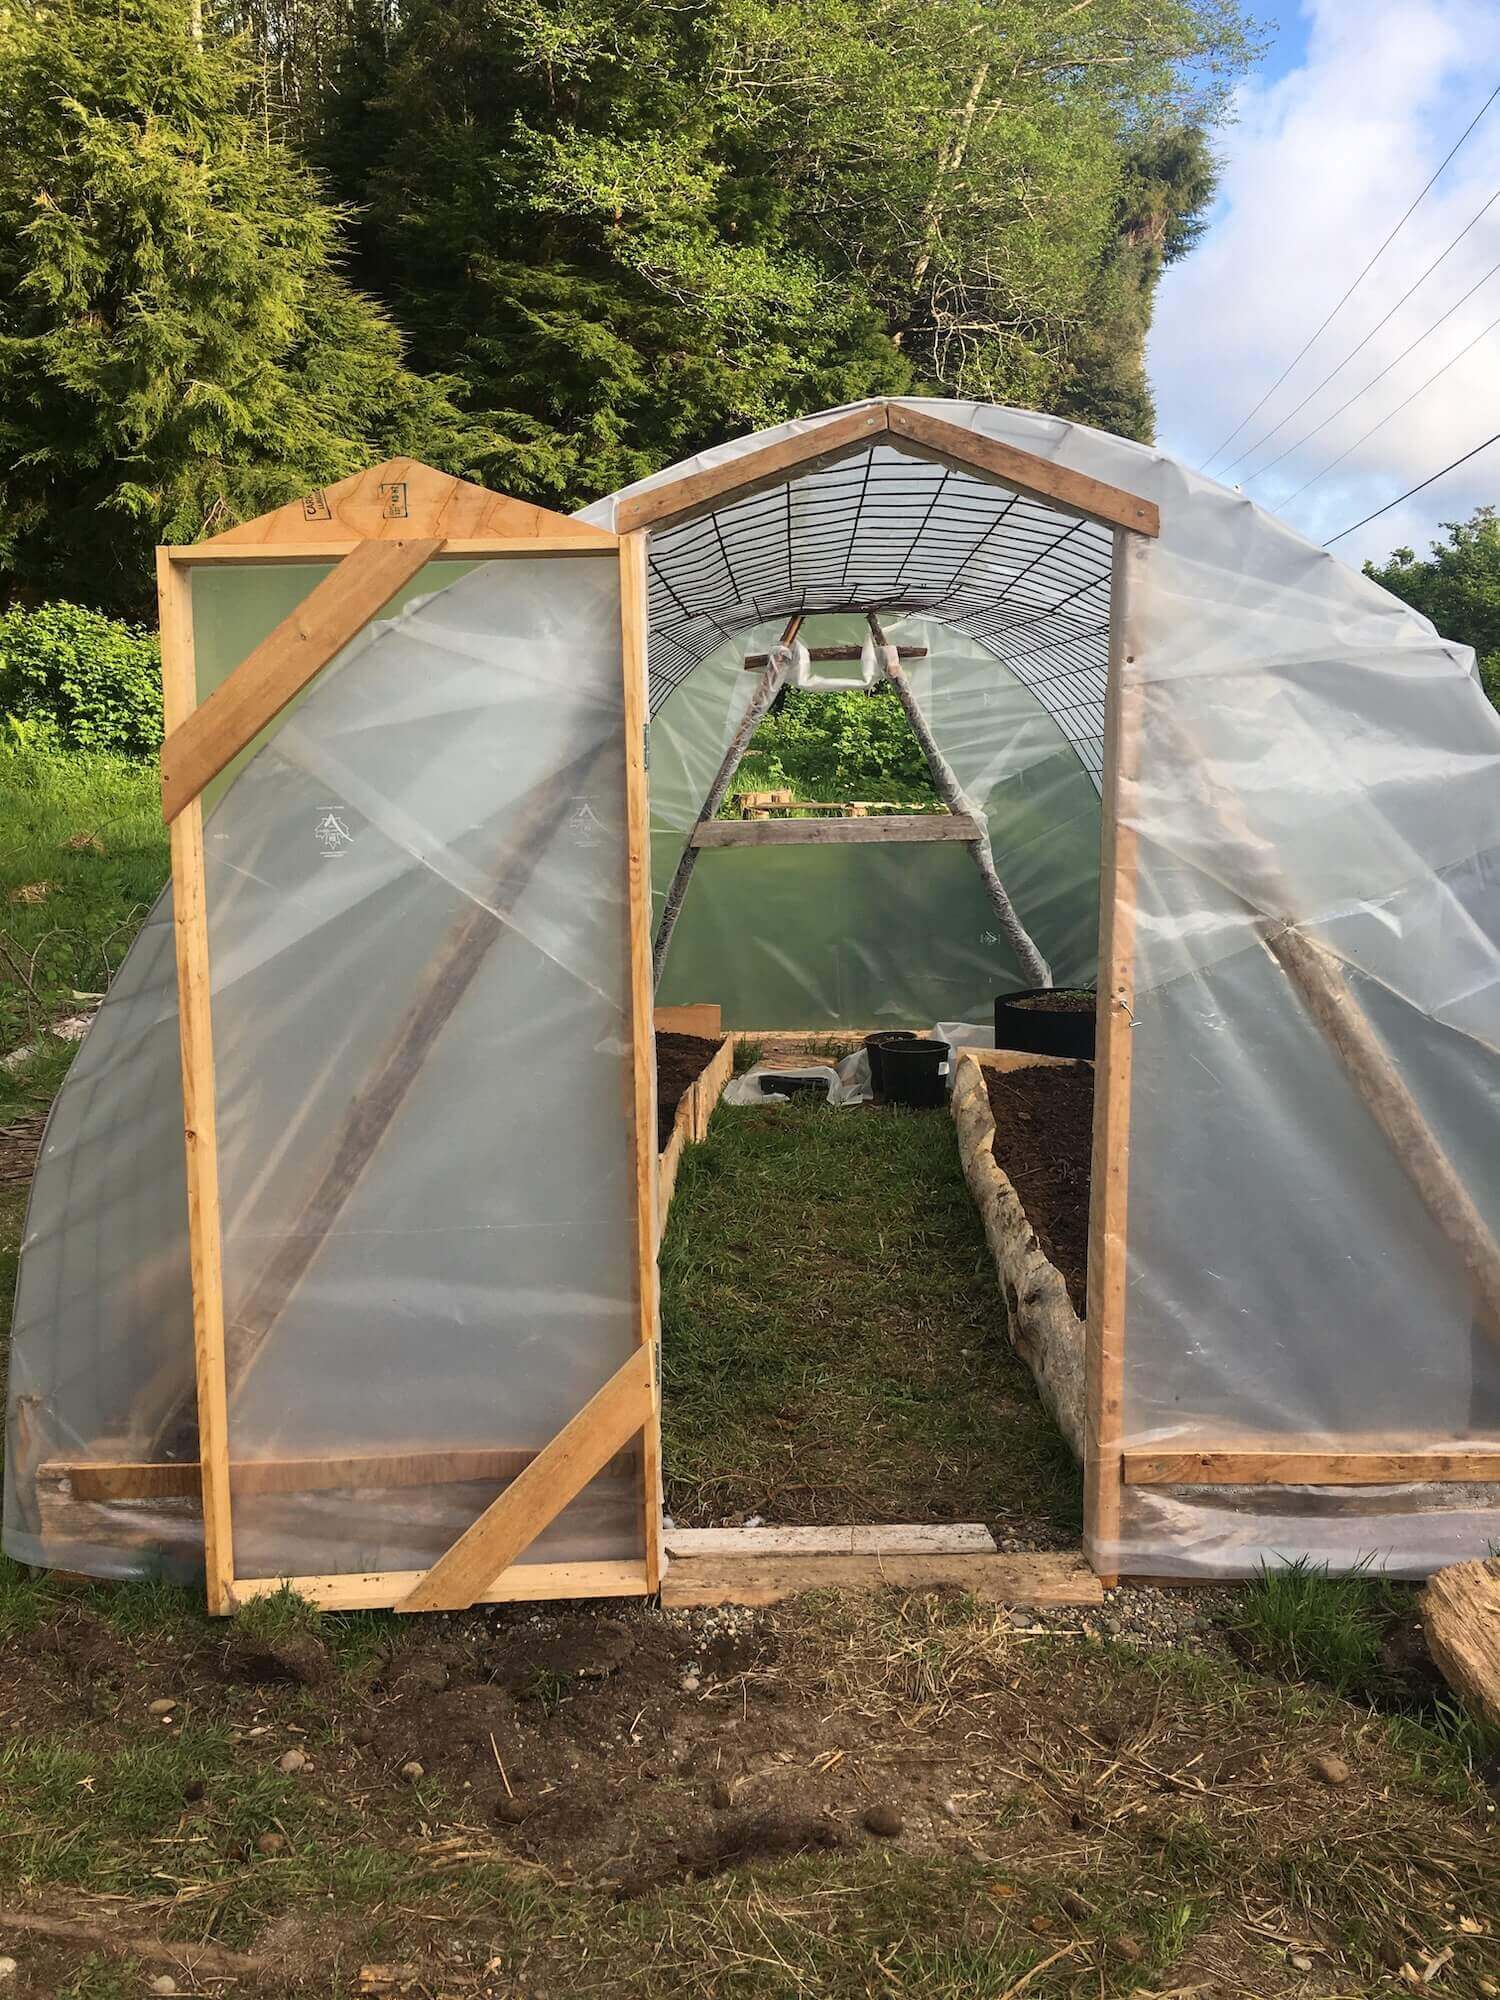
Now that I had the arch of the mesh to work with, I got to work building a door frame, and a wall frame with a window vent. I used the dimensional lumber to frame out the door, and some of the cedar posts (~6”x8”) to bolster the door frame against the end posts.
For the end-wall and window frame, I built an a-frame with a window sill from the stray branches and driftwood I had foraged and bolstered that frame with a full-width 6”x8” cedar beam. The a-frame sits on top of the beam, and the upward force holds the end of the mesh up high.
The next day, it was time to pull the poly over. Don’t apply poly to your greenhouse if it’s windy. After about 2 hours of struggling against the wind, I had to give up and wait for a quieter day.
Soon enough, I managed to get the frame wrapped. Using some clever folding techniques (I thought so, anyway), I made sure to keep it tight despite the odd angles and shapes it was covering and folding over.
Once the plastic was in place and wrapped around the frames on the ends, I set to work on the taping. Using the UV-resistant poly-tape (very sticky and weatherproof) I fused the poly, and attached it to the frame, and taped down some of the neatly folded flaps.
The next day, I framed a basic little door using dimensional lumber (1”x6”), attached the hinges, measured, cut and stapled on the poly, and hung it in the frame. The window was simply a flap with a washer embedded between two layers so I could clip it onto the window frame.
The gardens
I knew from the beginning that I wanted to use slab off-cuts for shaping the beds. It’s such a plentiful resource, and if you can find cedar, it will stand the test of time - even on the ground.
I managed to barter some cedar slab off-cuts from my neighbour (who is a great neighbour) in exchange for a few litres of homemade mint and lemon balm soda.
I shaped the beds with the slabs and layered cardboard over the grass below. On the cardboard, I added several wheelbarrows full of leaf mould, twigs, and a few armloads of punky alder chunks (they were crumbling in my hands – beautiful stuff!) from an abandoned firewood pile.
When I went to pick up the cedar slabs, my wonderful neighbour mentioned that he was reshaping his driveway, and had to move some incredible, black, fluffy, forest topsoil on one of the shoulders. He offered as much as I could carry. I showed up with my little trailer and loaded it up. I wasn’t going to let that stuff go to waste!
Once the beds were topped up with soil, I immediately watered and sowed a cover crop of alfalfa.
Here’s a list of what I planted.
Unexpected success
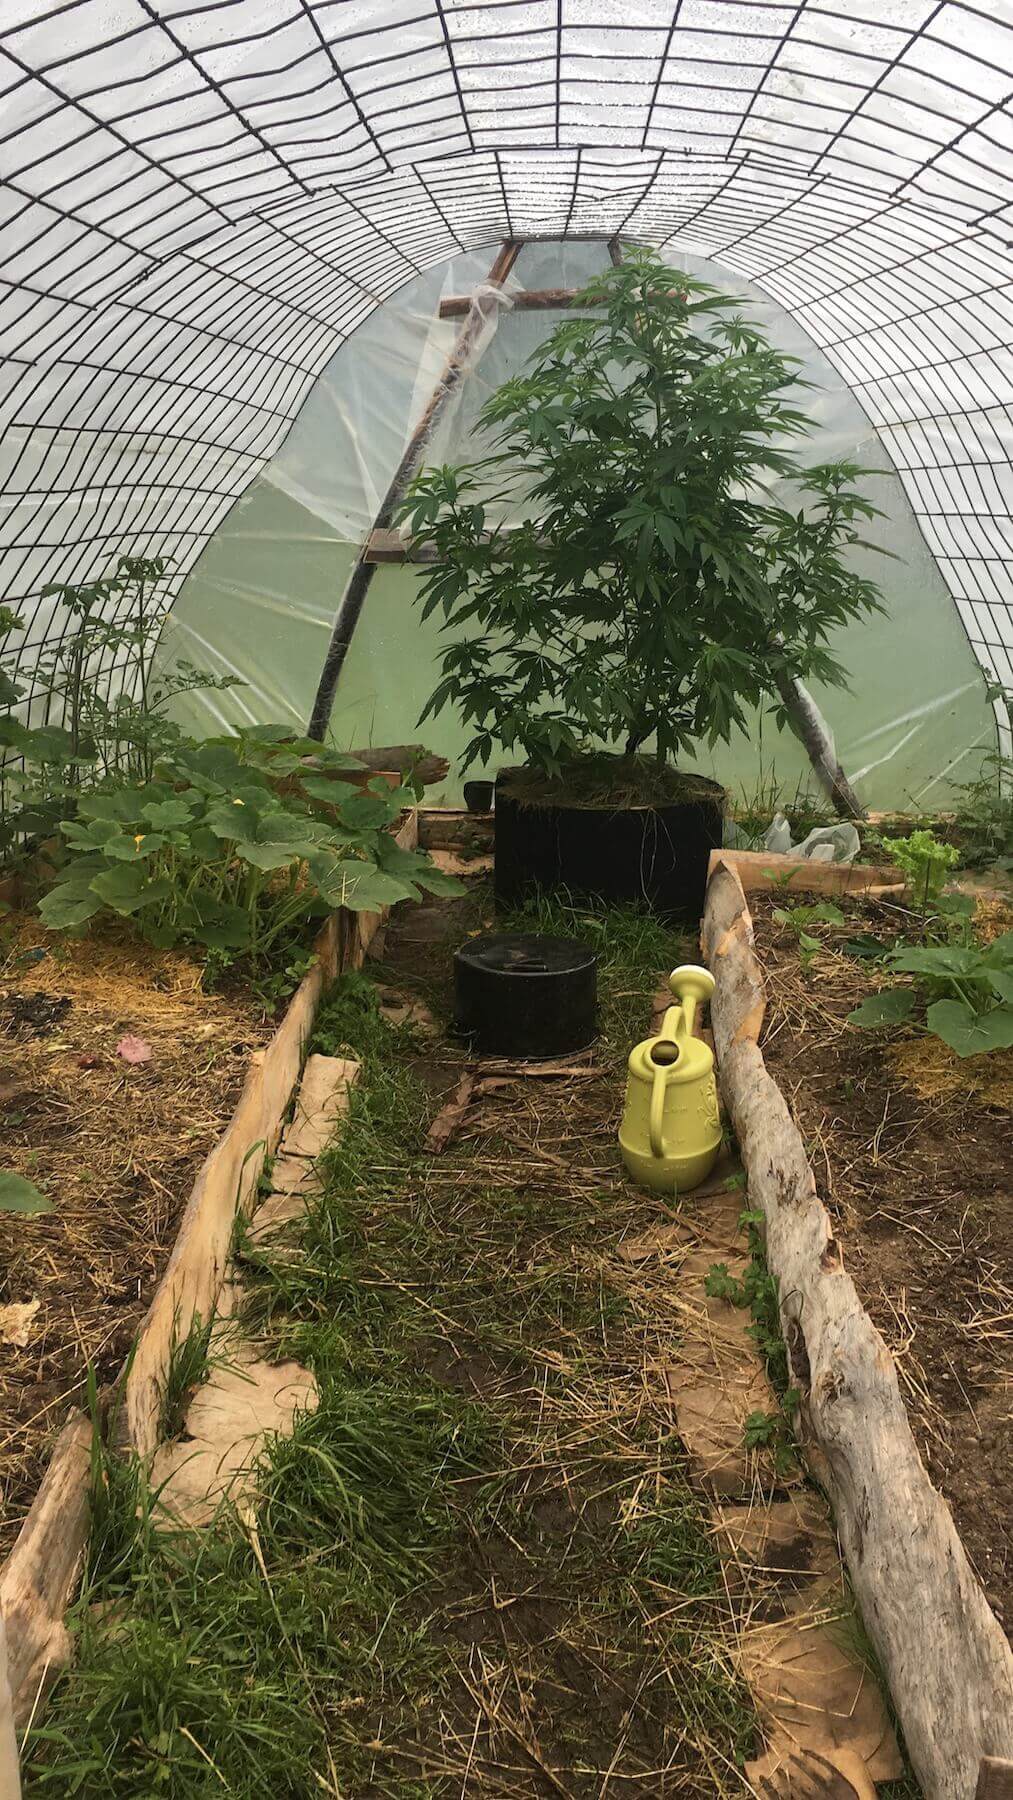
One of my favourite aspects of this setup was the vertical space. Although the greenhouse itself is only 6’6” high, there is ample room for vining plants to grow up the sides, using the mesh as a trellis. This worked remarkably well for vining squash. It was a wonderful surprise to walk into the greenhouse and admire all my hanging spaghetti squash as they brightened towards harvest. Tomatoes were a lot easier to manage, with jute tied to the top of the arch guiding the plants along in between the squash.
The tomatoes and spaghetti squash flourished here. Many of the other crops did not. It could be attributed to several factors (as is gardening), but both of these crops are especially well suited towards this environment. I think I’ll be doubling up on these next time!
As an added bonus, the greenhouse seemed to prove an ideal habitat for the little green tree-frogs we’ve seen around the yard. At one point we counted over 20 of them hanging out in the greenhouse! They loved the spots between the slabs of the raised bed and the poly. Nice and point, and ready for action if any bugs should come near. Being a source of heat, it also attracted a number of bugs so it made for a perfect tree frog habitat. The frogs in the picture below lived in the cannabis plant for over a week, nestled in the leaves.

Mistakes and what I would do differently
My biggest mistake has nothing to do with the design of this greenhouse, but with how I put the garden beds together; I built the frames before putting the cardboard and leaf mould down - in an attempt to smother the grass and buttercup underneath. What I should have done was place the cardboard and leaves down before framing the beds, so the buttercups and grass wouldn’t have as much room to creep through the cracks.
Another issue is water saturation. I placed the greenhouse on a flat spot, at the bottom of a slight pitch. When it rains for days on end (as it does up here) this ground get very saturated, and the water seeps through the soil into the greenhouse, creating a terribly wet environment. If I had thought about this or had the means, I might have dug 9” down and filled the area with sand or gravel to assist in the drainage of the area. For now, I may have to dig a small diversion ditch around the backside of the greenhouse.
–
One of my favourite parts of permaculture and gardening is experimentation. You can gain so much more from first-hand experience, and if you have the means to improve your outputs with even less input - why not give it a try?